Finding a Bottler/Co-Packer
So now you have your recipe all set, have made it a few times as sample batches, and you’re ready to scale up to produce a production run that you can start selling. Believe it or not it is not that easy to find a bottler (referred to as a “co-packer”) on the internet. It doesn’t seem like they advertise all that much, don’t have discoverable web sites, or have multiple business lines and bottling is just a side thing for them.
I found that the best way to find one was to go to a local hot sauce festival (or even a farmer’s market, Saturday morning market – you get the picture) and ask around. Turned out that many of the vendors used the same bottler. The bottler also had his own line of sauces and was at the show, so I got to meet him in person and talk about bottling my product.
I did, however, find a few other options that are national in nature. These co-packers have large minimums and often charge an R&D fee ($600 per product was a quote that I got from one of them). This is tough when you are small and just getting started. They are more geared towards the large brands that want pallets of stuff at a time shipped to multiple warehouse locatoins.
Finding a small local guy is the way to go. No R&D fees, close by, smaller minimums means that you can turn inventory faster which keeps your product fresher. Also staying local cuts down on your overall costs because you will not have to have the product shipped to your storage location. Glass bottles full of hot sauce are heavy and are expensive to ship.
So the best advice I have is to ask around locally when you see a local product that has been bottled for commercial sale.
As an alternative, you can package your own product. You will need to rent a commercial kitchen that has been approved and inspected by the FDA for this to be entirely legal. I did not go this route for the following reasons:
- I do not have the connections to get bulk products at wholesale prices (veggies and other stuff).
- Bottling a large batch of sauce is very time consuming. I still have a full-time job and didn’t want to spend an entire weekend in a kitchen making sauce.
- Bottling it yourself means you assume all of the liability if you make someone sick with your product.
Once you find a bottler you will work with them to get a price per bottle, minimum batch run, and need to pay him about half of the total to get started. He should also be able to run the nutritional information you will need for your label. He will likely charge you for this since he had to buy the software that provides this information (mine charges $75 per product).
You’ll need labels for your bottles…I’ll post about that next.
Growing Peppers – Start from the Bottom of the Post
The posts are in order as to how things progress, so start at the bottom of this category and work your way up if interested. Comments are welcome – we all learn from doing. This is stuff that worked for me and I hope it helps other people give it a whirl.
Process (Save) Your Peppers
If all goes well, you will have more peppers than you can possibly eat at one time as they ripen towards the end of the season. At first you may just get a handful ripe at one time and that is perfect for just picking and using in your cooking (toss a few in your eggs, make some tacos, etc.).
There are some simple and some not so simple ways to preserve your peppers. I’ll explain a few of the simple ways below and then move on to the harder stuff as I walk through the process myself later this year.
Stick them in the fridge
By far the easiest, just put them in a plastic zip bag and store them in the veggie crisper in your fridge. This will keep them fresh for about 2 – 3 weeks and give you time to use them up in your cooking. If they start to get squishy, they are beyond their usable age and should be thrown out. The pepper should remain firm as long as it’s good to use.
Dry them
If you have a dehydrator, then you can use that to dry your peppers. Just follow the directions that came with your unit.
I don’t have one so I use a regular sewing needle and thread to string them up. I push the needle through the green part of the pepper and repeat until all the peppers are on the thread. Then, hang them up in a sunny location to dry. Make sure there is space between each pepper so there is adequate room for air circulation.
This technique works great for smaller (Firecracker, Thai, Rooster) or thin peppers (Long Slim Red, Cayenne). I wouldn’t try it for the meatier peppers as they tend to contain a lot of moisture and could rot rather than dry. If you want to dry those kind I’d suggest getting a dehydrator.
After they are dry, you can store them in a plastic zip bag in a cool, dark, and dry location for a really long time. This is also a good way to preserve them for keeping at room temperature (they don’t need to be refrigerated once dry).
My preferred method is to smash them up and put them in a spice jar for use in cooking and as a pizza topper. You can smash them by hand or use a coffee grinder (just don’t use it for coffee again unless you like spicy coffee).
Here’s how I hang them in a sunny spot to dry:

Drying Peppers
Make Hot Sauce
This can be quite a bit of fun. Start with the following basic recipe and then you can add your own ingredients to get your own unique flavors.
Ingredients:
-
-
1 cup of white vinegar, 5% acidity
-
2 cloves of garlic, minced
-
1/2 teaspoon of ginger
-
1/2 teaspoon of allspice
Instructions:
-
Use caution when cutting your peppers. Wear rubber gloves and do not inhale and steam or vapors that arise from processing your sauce. Also use the exhaust fan over the stove and open doors and windows if possible.
-
Remove the stems from the peppers and coarsely chop them up. You can remove the seeds if you want a milder sauce, but use them if you like it good and hot.
-
Bring 2/3 cup of vinegar to a boil.
-
Add the peppers to the boiling vinegar. Cook for about 5 minutes until the peppers begin to soften, but you don’t want them mushy.
-
Remove the peppers from the vinegar and put them into a blender or food processor. Retain the vinegar for later use.
-
Add the garlic, ginger, and allspice to the blender or food processor.
-
Add the remaining 1/3 cup of vinegar to the blender or food processor.
-
Blend until smooth and pourable. Use the reserved vinegar to thin the mixture to your desired consistency.
-
Use a funnel and pour into a bottle and cap tightly.
-
Label the bottle and allow it to cool to room temperature.
-
Once cool, place in the refridgerator.
If you don’t have any bottles, we like the full kit that they sell at PepperMania.com.
Freeze Them
Peppers can be stored in the freezer, but you must take care to properly blanch them before freezing. To blanch, remove the stems from the peppers and cut in half. Bring a cup of vinegar to a boil. Add the peppers to the boiling vinegar and blanch for 3 – 5 minutes. Remove and drain the peppers, then put them in a freezer safe container or bag. Now you can store them for a long time in the freezer, up to a year.
Follow safe handling procedures when working with peppers.
Pickle Them
This is a pretty easy way to make pickled peppers. You’ll need to get some canning jars or similar containers to follow this method, although you won’t need a full canning set up.
Cut up your large peppers, generally in rings like store bought bannana peppers, or any size that you like. If you want to pickle your smaller peppers whole, then pierce them 2 – 3 times or they will burst when
pickling them.
Add a clove over garlic, cut in half, to the bottom of each container. This is also when you’d add any other spices that you want to use for flavor. Once you spices are added, fill the containers with your peppers.
Next, bring a cup or two of 5% acidity vinegar to a boil. Add a tablespoon of pickling or kosher salt to the vinegar (do not use regular table salt as it contains Iodine and will cloud the mixture). Use one tablespoon of salt per cup of vinegar.
The exact amount of vinegar will vary with the number of containers that you need to fill. Once boiling, carefully pour it over your peppers to within 1/4 inch of the top of each container. If using glass jars, run a plastic knife around the inside of the jar to remove any air bubbles. Wipe the top of the container clean, then seal with the lid.
When the containers cool, place them in the fridge for at least 2 weeks before eating them to let the flavors meld. Using this method, you must store them in the fridge as they won’t be shelf stabilized.
If you wish to make shelf-stable canned or pickled peppers, you will need to get a
home canning kit and follow the processing instructions that come with it.
For peppers, it’s also nice to use the
small jars as you can then share with friends and family.
Visit us at
www.hotpepperdudes.com for an idea of what you can do with hot sauce when you hit on a good thing.
Tend Your Crops
Once you have them in containers, it’s a good idea to
fertilize on a regular basis. At most, do this every other week. Some fertilizers last longer than others, so read the packaging to see how often they recommend applying.
Epson Salt Spray
Epson salt contains magnesium which pepper plants really like. You can get this at any drug store in granual form. Get a cheap spray bottle that is at least 32 oz. (1 quart) and mix in 2 tablespoons of the epson salts. Shake well to dissolve.
Every other week, on weeks that you do not fertilize and after blooms have started to form on the plants, spray the leaves with this mixture. I suggest doing this after the plants are out of direct sunlight for the day as the water on the leaves mixed with direct sunlight can burn the plant.
Bugs
Watch out for aphids. Growing herbs in containers close to your pepper plants will naturally deter those critters. If that’s not an option or it’s not working, there are plenty of products on the market to spray on the plants to eliminate the pests. The key is to keep an eye out for them as they are hard to see.
Watch Them Grow
You’ll see blooms first, then peppers will form. Peppers generally start green and then take time to ripen to the full red color. Some of the funky brands are starting out purple in color. Here are some photos of how things look as the process progresses.
Blooms

Blooms
When are they ripe?
Hot peppers are entirely ripe when they have turned red. These purple guys will progress in coloration and turn red – and be hot. Jalapenos will turn red too and be hotter than the green ones. Chipotle peppers are actually smoked red Jalapenos – that’s a little known fact Normy.
You can eat the peppers whenever you want, but they won’t be their hottest until they are red.
Good luck, it’s fun to watch them grow!
They grow up so fast…
Just to show the plant sizes through the growing season, here is a comparison.
May 1:

May 1 size plant
August 1 size plant:

3 Months of Growing Outdoors
Enjoy…head on over to www.hotpepperdudes.com and let us know how you are making out.
Transfer to Containers
You will know your plants are ready to be transferred to containers (or the garden if you have room for one) when two things occur:
Some sites will tell you the plants need to be 2 – 3 inches tall. I find the root test to work better since different varieties of peppers grow vertically at different rates. When the roots are leaving the peat, they’re ready for soil.
This year I’m trying a few different types of containers. Single pots, long boxes for two plants, and even a hanging planter. Not sure which ones will work the best, but we’ll find out by the end of this season.
Soil
For your containers, I find that any potting soil or garden soil works fine. There are lots of types on the market, so you can go organic if that’s your thing. Mix in a scoop of sand and stir around with every container full of dirt to aid in drainage.
Buy more soil than you think you need. These containers will hold more than it looks like they will (unless you only have one or two pots)
Containers (Pots)
The biggest thing to worry about here is that they have drainage holes in the bottom. If not, water will collect and rot the roots of your plants. Also, pepper plants like well drained soil, they don’t care much for being constantly wet.
As far as the size, I’m going with the theory that bigger is better. I’d say the minimum size is a 12″ diameter pot for a single plant. I do notice that the plants get bigger with bigger pots, so if you have room for larger ones then I would go that route. Here’s a shot of the ones I’m using this year:

Pepper Containers (Pots)
Containers (Long Boxes)
There’s probably a technical term for these, but I just call them long boxes. You can see one of them above. For these types, I am trying just 2 plants per box. I think any more than that and they wouldn’t have room for the root system to develop. Here’s a closer image of this type:

Long Box Container
Containers (Hanging)
This is a total experiment. I’ve never used one of these things but I’ve read a lot of good reviews about them. Anything is worth a try once, and as a container gardener, this thing does not take up a whole lot of space and you can plant up to 7 peppers in one hanging garder. I got it
here if your’re interested in trying it. This is what it looks like:

Hanging Pepper Grower
I did not fill up all the openings on this as I did not feel it was a large enough container for all of them. I tried 4 plants in this thing. We’ll see what happens.
VERDICT: This thing does work as advertised. However, the plants do not get very large and do not produce as much as if they were in a pot by themselves. Also, this product only lasts one season. As we were cleaning up the plants this year, this planter nearly disintegrated as we removed the dirt.
Mulch
You’ve probably noticed from the shots of the containers above that I use mulch. I find this helps to retain moisture in the soil. Also, I use Cedar mulch with seems to help keep bugs away. I would highly suggest using your favorite kind of mulch around the plants, but keep it away from touching the stems. You’ll get bigger plants this way.
Labels!
As you are potting your plants, it’s a good idea to label each one with the variety that you have planted in there. If you grow lots of different kinds, it’s good to know which ones do best in your climate and also the ones that you like the best. Then you can grow the best ones next year and drop the ones that you don’t like or don’t grow so well in your area.
Next
Have fun…this part will take you a while if you have a dozen or more plants to pot. Next we’ll talk about getting on a fertilization schedule.
Germination and Hardening Off
After, you start your seeds you will be patiently awaiting the first sprouts. You’ll want to keep the peats moist at all times, but don’t over water them. If they still are dark in color, they are plenty wet.
Germination
You’ll note that each variety of pepper plant takes a different amount of time to germinate. For instance, my Rooster Spur varitety germinated in just 8 days whereas I’m still waiting for my Big Jim pepper to do so (it’s been over 4 weeks now).
Once you see your first plant germinate, you’ll want to crack the greenhouse dome to allow some air in. You don’t need to remove it, just pop up a corner.
You’ll know it’s time to remove the dome entirely when the first of the plants touches the top of the dome. At this point, remove it and put the whole tray in a sunny location (still inside).
Keeping the peats moist will require more attention now since the dome has been removed. I use a spray bottle full of water and just give them a light spray each evening. In this manner you can avoid over watering and still provide a good environment for the rest of the seeds to germinate.
Hardening
Once all of your plants have germinated, you’re going to want to start helping them get used to being outside. You should wait to start doing this until:
-
The plants are two inches tall (or more), and
-
The outdoor temperatures are consistently above 65, at least during the day.
Keep in mind that your plants have been living a very tame life in your climate controlled home since they were born. Teaching them the realities of the real world (full sun, wind, etc.) should be done a little at a time so they can get used to it.
The best way to do this is to place them outside for short periods of time and then expand those periods little by little until they can stay outside all day long.
-
Day 1 – Place plants outside for 1 hour.
-
Day 2 – Place plants outside for 2 hours.
-
Days 3 – 10 – Increase outside time by 1 hour each day.
-
After that, leave them outside all day and bring them in at night.
-
When night temperatures consistently remain moderate (50 degrees plus should be fine at this point), the plants can be left outside full time.
If at any point during the hardening process you notice the plants drooping or browning, do not increase the time outdoors the next day (use the same time outside until they look like they’re handling it fine).
Also, keep in mind that you will need to water these guys every day when they are still in peats as the direct sunlight and their growth will rapidly deplete the water. It’s best at this stage to just add water to the bottom of the greenhouse tray and let them absorb what they need. If you add too much, just pour off the excess.
Once your plants are hardened off and ready to stay outside full time, it’s time to select a permanent growing location for each of them.
Starting Hot Peppers from Seeds
In order to do any growing this season, you must have your seeds ready when it’s time to start planting. Over the winter, it’s a good idea to take stock on what seeds you already have and see if you need to replace any favorites or try some new varieties.
I order all my seeds from
Pepper Joe. I consistently get 100% germination from his seeds and he throws in free seeds with every order. Check out the catalog to start planning which varieties you will grow this year.
Also, if you are a salsa fan, nothing beats adding your own home grown tomatoes.
Pepper Joe has a sister site, called
Penny’s Tomatoes, where you can get a large variety of tomato seeds. You won’t find these varieties in a grocery store and Penny also throws in free seeds with every order.
Personally, I am a fan of growing the kinds of peppers that you can’t buy in a grocery store.
By the time the new year rolls around, it’s time to place your order. After January 1st,
Pepper Joe adds new seeds for the year. I use this as an opportunity to impulse buy one of his new varieties and give that a shot. I shoot for a total of 6 varieties, 2 plants each, to grow during a given season. This is largely due to space limitations more than anything else.
OK, so now you’ve figured out what kinds of plants you want to grow this year and you’ve ordered your seeds. After they arrive, the fun begins. If you live in a warm climate you’ll want to start your seeds in February. As you work your way up to cooler climates you’ll want to start a little later, but everyone should certainly have them started by April. The rule of thumb that I use is to start them 45 days before you are able to put them outside (temperatures consistently above 65 degrees).
Planning
Get yourself a 12-peat mini greenhouse to start your seeds. You can pick them up at any home improvement center in the gardening section or you can
order online.
Next, label the front of your greenhouse so you can lay out where each variety will be planted. Make a map of where you planted each type of seed so you remember what kind is where – believe it or not, it can be challenging to tell them apart.
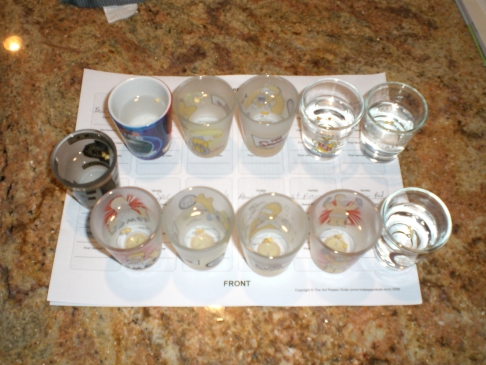
Prepare the Seeds
For best results, it’s advisable to soak your seeds in warm water over night before planting them. You’ll want to soak 2 – 3 seeds per each plant you intend to grow just in case some don’t germinate. I generally just soak 2 per plant as the seeds I get from Pepper Joe tend to 100% germinate.
Soaking them gives them a head start when they get into the peat. The easiest way I’ve found to do this is to use a shot glass for each variety. You can then arrange the shot glasses on your greenhouse planner so you know which ones go where, like this:
Plant the Seeds
The next day, your seeds are ready to be planted. Open up your mini greenhouse to get started planting and make sure the peats are seated properly. It should look like this:
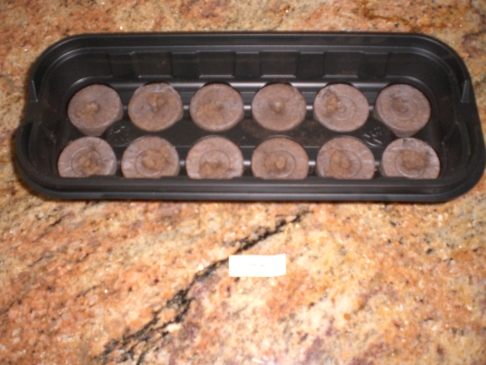
This is a good time to label the front of it so it matches up with your greenhouse planner sheet.
Add warm water to the tray and allow the peats to soak up the water. Keep gradually adding the warm water until all of the peats have expanded. Once everything has expanded, the peats will be a dark (wet) color and be ready for planting.

Break out your gardening tool (a toothpick) and use it to loosen and level the top of each peat. If there is excess netting, just peel it back and snip it off with scissors to expose the top of the peat.
Now, just put your seeds in each peat and lightly cover them with the loosened peat. No need to plant them deeply, just enough to cover the seeds.
After all of the seeds have been planted, place the dome on top and then put the mini greenhouse in a warm location that is not in direct sunlight (on top of the fridge works pretty well).
Wait
As Tom Petty would say, the waiting is the hardest part. Some seeds germinate quickly (a matter of days) and others can take weeks.
Check out www.hotpepperdudes.com for new sauces and events. We’re also more active on Facebook with general stuff, you can find our page from the above link.
Preparing your Recipe
So you make this great product that everyone likes, but is your recipe something that a bottler (co-packer) can work with to re-create your unique product? For me, the answer was no at first, and I had to work on it for a few weeks to get it in a condition that they could use to replicate my sauce.
These are the biggest things that I learned and now create every recipe the same way so that my bottler can easily follow it and I get consistent results.
- Every ingredient that is not a standard unit of measure needs to be weighed. For instance, I use a lot of fresh veggies in my sauces. Saying “1 medium onion” or “5 Ghost Peppers” does not give the bottler enough accurate information to work with. The reason is that fresh vegetables are all different sizes…who is to say that one medium onion purchased at one location is exactly the same size as another? So for these types of ingredients, I weigh everything both before it gets chopped up (raw form) and after it is chopped up and ready to go into the sauce. Most bottlers can work with either ounces or grams, so either is fine. I find grams to be a little easier for weighing very light things – like fresh herbs.
- Every other type of ingredient should just list the standard unit of measure, for instance “1 TSP Ground Mustard” or “2 Cups Vinegar”.
- Provide cooking instuctions. Note that every bottler that is going to create a shelf stable sauce/condiment for you will always cook it at 180 degrees or higher since this is the temperature that kills all the bacteria in vegetables (much higher temperatures are needed for canning things that contain meat, so that is outside of my experience). 180 degress is generally what I consider a simmer when cooking at home, but it is short of boiling. So take that into consideration when cooking your sauce.
- The instuctions should also contain step for what needs to be done after the product is cooked. Is it bottled as-is, or do you run it through a blender? All the steps you go through need to be noted so they can follow it correctly.
- Note how much product your recipe makes. This can just be in total ounces. So if your typical batch makes 12 bottles of hot sauce and each is 5 ounces, then your batch size is 60 ounces. This gives them a gauge for how to scale the recipe up for larger production.
- Make your product a few times to make sure you can follow your own recipe and didn’t leave anything out. If you can’t follow it, then it will be hard for the bottler to do so and you won’t be happy with the end result.
Another general consideration is to think about your ingredients and if they can be locally sourced. Maybe you can substitute a more generally available (cheaper) ingredient that doesn’t change the flavor of your sauce and end up with a more economical product. Just to give you an example, I use Ghost Pepper in all my products. This is not grown locally and I have to purchase it from a grower in New Mexico. In this case I wasn’t able to substitute anything else becuase that was what really gave them the unique flavor that I wanted in my products. So, just be prepared that this will add to your overall costs of production – Ghost Pepper isn’t cheap, and if you have something rare in your product it won’t be cheap either.
Next we’ll talk about how to find a bottler/co-packer to produce your product.
Introduction to Starting Your Own Hot Sauce Company
I didn’t know anything about how to start a hot sauce company a little over a year ago. What I did know was creating tasty sauces that everyone seemed to enjoy, so I figured I’d look into getting the product professionally bottled. While searching for tips online about how to do this, I couldn’t find any start to finish articles, ebooks, or even traditional print media that described this process entirely so it took a bit of time to figure it all out. What I’m hoping to accomplish with this blog over time is to provide aspiring sauce-makers with the information they need to get started more quickly than what I was able. This will all be based upon my experiences, so there are certainly other approaches that could work as well.
If you are reading this, you are likely to have a recipe for a sauce or other specialty food product that everyone loves or you wouldn’t even be thinking about starting it up as a company. The very first question you need to ask yourself is if the market really needs another hot sauce, BBQ sauce, or whatever other product you are looking to bottle. I’d say if your product is unique, then the answer is yes. People that enjoy these types of products are often adventurous and like to try new things. They’ll have a “go to” sauce they use everyday but will generally be interested in trying new things.
Some questions I think you need to ask yourself before deciding that you want to start your own hot sauce company:
- What makes my product unique?
- Is there anything else on the market today that is so close to mine that it would be difficult to tell them apart?
- Would my family and friends who have tried my sample batches be willing to buy the product moving forward? (You may never actually ask them to pay for it, but helps you gauge marketability)
- Am I willing to commit cash to getting this off the ground?
- Understanding that this will not replace my day job in the near term, am I willing/able to commit my time on nights and weekends to work on this?
- Will my spouse/significant other support the time and money investment?
If you’ve worked through all those questions and the answers support starting the business, then you are likely in good shape. In reality, those are the same basic questions you’d have to ask yourself before starting any small business. Also, you may just be considering this as a hobby in which case you wouldn’t need to be as stringent. Just keep in mind that when you have something professionally bottled, you will end up with a lot of product!
In the next entry I’ll talk about getting your recipe ready so that you will have what you need to speak with a bottler.
Hot Pepper Dudes, LLC Wins 2011 Fiery Food Challenge!
Hot Pepper Dudes, LLC has been awarded the Golden Chile for Hot Sauce – Pepper Blend in the 2011 Fiery Food Challenge for Fire Out the Hole! Additionally, the company takes third place for Barbeque Sauce – Mustard Base Ghost of Carolina!
Tampa, FL – 2/5/11
On January 28, 2011, the most prestigious awards in the spicy food industry were distributed at the Fiery Food Challenge Awards dinner in Irving, Texas, and Hot Pepper Dudes, LLC came out on top! Fire Out the Hole! and Ghost of Carolina took home First Place and Third Place, respectively, in their categories.
The Fiery Food Challenge, a competition sponsored by The Dallas Morning News, pits products against one another in more than 100 categories. Professional judges evaluate hundreds of sauces, salsas and other spicy treats and award first, second and third place prizes in each category. Awards are proudly displayed at ZestFest, a spicy, zesty and flavorful food event held the same week as the Fiery Food Challenge at the brand new Irving Convention Center at Las Colinas.
Being new on the market (just released in August, 2010) this is the first competition into which the sauces have been entered.
Chris Billet, Chief Sauce Officer, said “This is really quite an honor and I’m very excited to have won awards for both our sauces! Being a brand new company, it’s great to see that the judges like our products as much as we do!”
Go to our website: www.hotpepperdudes.com for more information on our award-winning products. You may also contact us at: chris@hotpepperdudes.com for more information.
For more information on the Fiery Food Challenge and ZestFest, visit www.zestfest2011.com or contact Pamela Betz at pambetz@aol.com or 407-876-4467.
#####


